WordPress Installation Demo 1: Email Sending Plugin (Fluent SMTP)
1. What Is Fluent SMTP?
Fluent SMTP is a powerful and free WordPress plugin that ensures your website emails are delivered reliably and securely.
By default, WordPress uses a built-in PHP mail function to send emails — such as contact form messages, password reset links, and order notifications.
However, many web hosts block PHP mail or mark these emails as spam.
Fluent SMTP solves this problem by connecting your website directly to a real email sending service (SMTP) — just like Gmail, Outlook, or your Hostinger Business Email.
2. Why Fluent SMTP Is a Must-Have Plugin
Fluent SMTP is one of the first plugins you should install on any WordPress site because it:
- ✅ Prevents your emails from going to the spam folder.
- ✅ Uses authentication (SMTP or API connection) for secure email delivery.
- ✅ Works perfectly with most WordPress contact form plugins (like Contact Form 7, WPForms, or Elementor Forms).
- ✅ Supports multiple email service providers — Gmail, Amazon SES, SendGrid, Zoho Mail, Outlook, and more.
- ✅ Keeps detailed email logs and delivery reports.
👉 Without it, your customers might never receive important notifications from your site.
3. Step-by-Step Installation Guide
🧭 Method 1: Install from the WordPress Dashboard
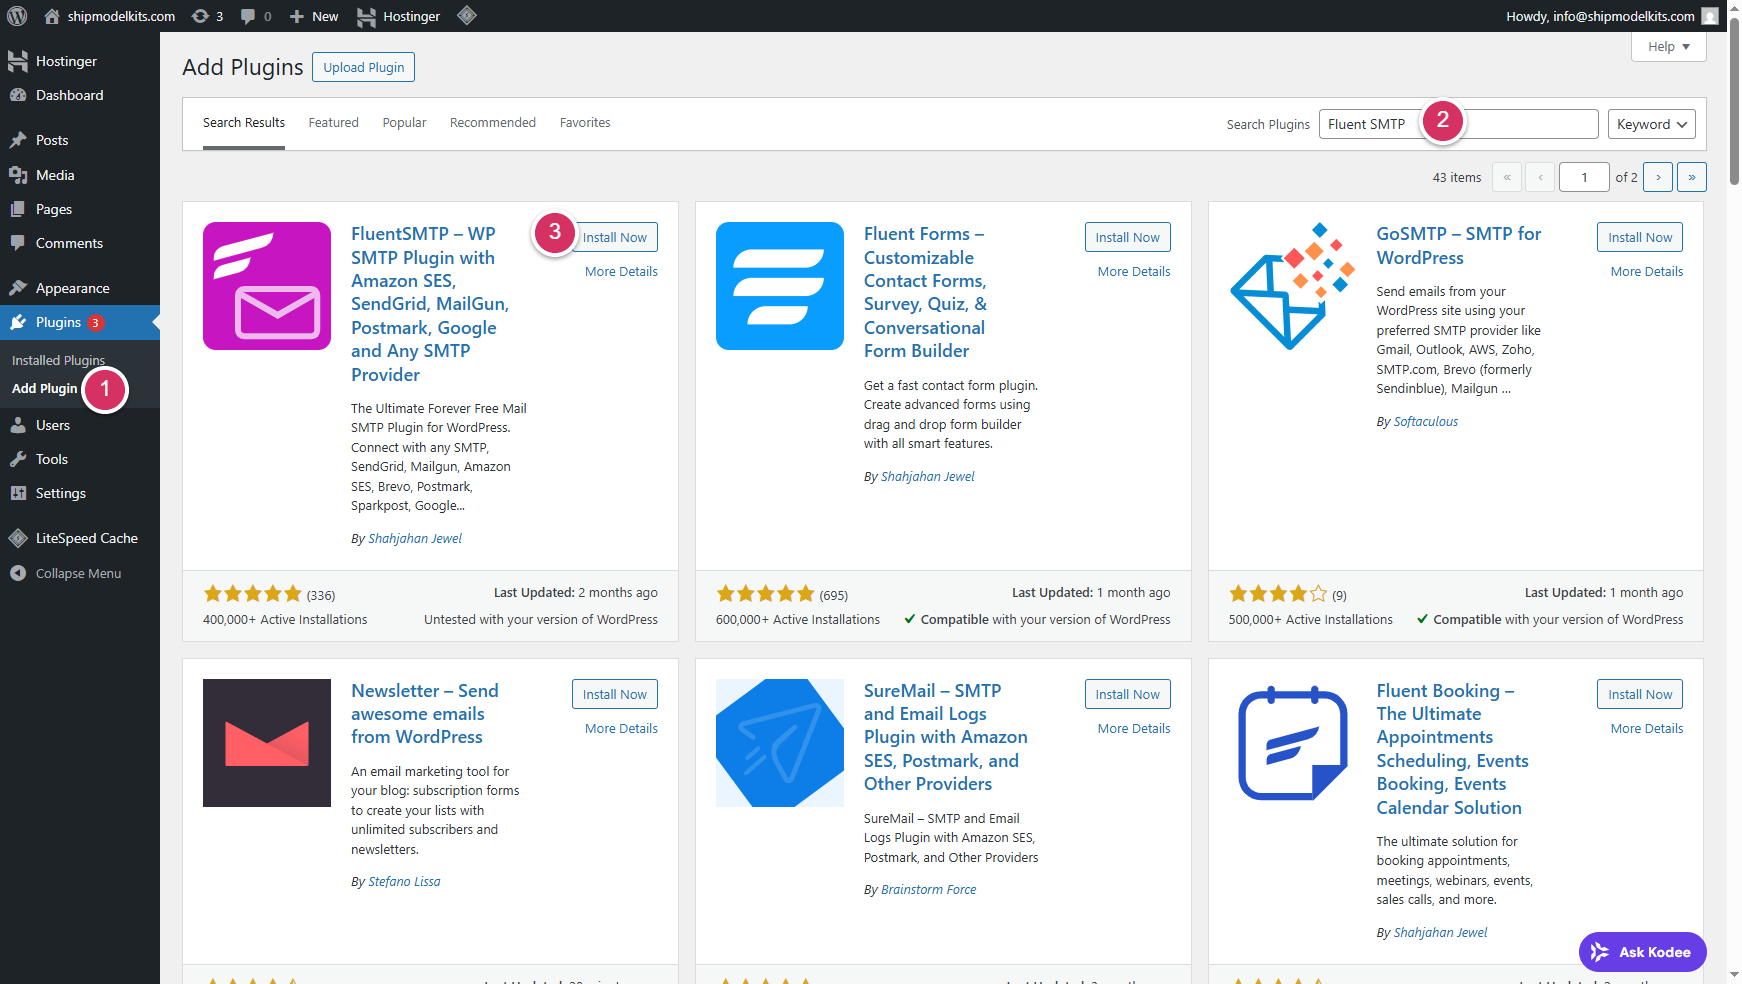
- Log in to your WordPress Admin Panel. Go to Plugins → Add New.
- In the search box, type Fluent SMTP.
- Click Install Now, Please wait a moment. After installation is complete, then click Activate.
You’ll now see a new menu item under Settings → Fluent SMTP.
4. How to Configure Fluent SMTP (via Plugin Management)
After activation, you can manage and configure Fluent SMTP directly from your Plugins dashboard.

Step 1: Access Plugin Settings
Go to your WordPress Admin Panel and follow this path:
Plugins → Installed Plugins → Fluent SMTP → Settings
This will open the Fluent SMTP configuration page.
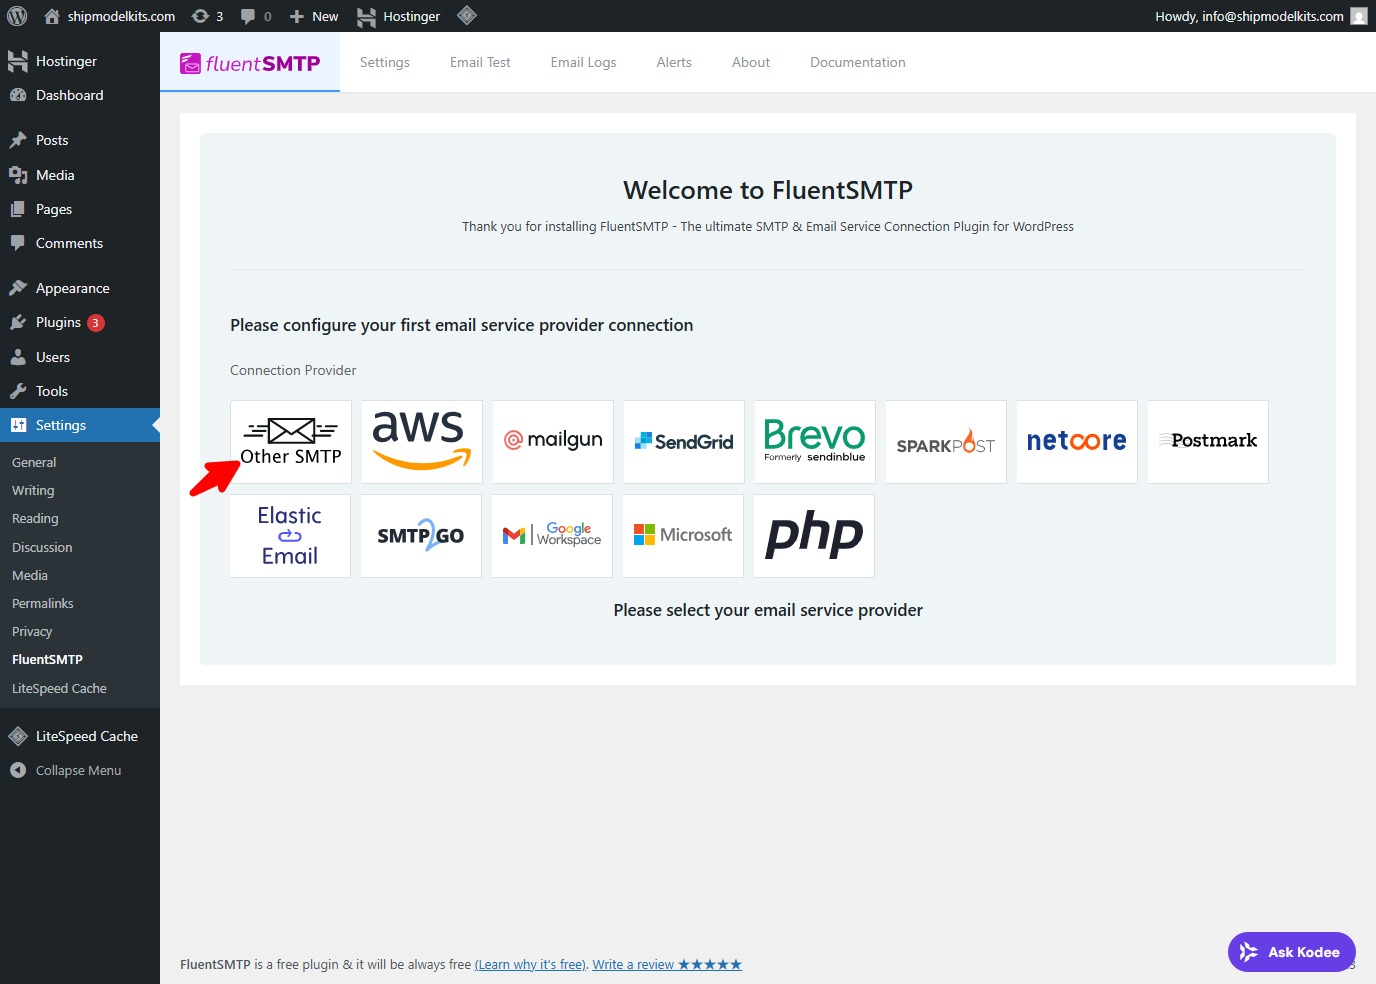
Step 2: Add a New Connection
Click “Add New Connection.”
You’ll see several available email service options — such as Gmail, Amazon SES, SendGrid, Zoho, Outlook, and Other SMTP.
Step 3: Choose “Other SMTP”
For this tutorial, we’ll use Hostinger Business Email as an example.If you are not using Hostinger’s business email, you can consult the AI about the setup method for that business email. It is largely similar to this one, with the main difference being the mail server address.
Select “Other SMTP” to manually enter your SMTP credentials.
Step 4: Enter Hostinger SMTP Details
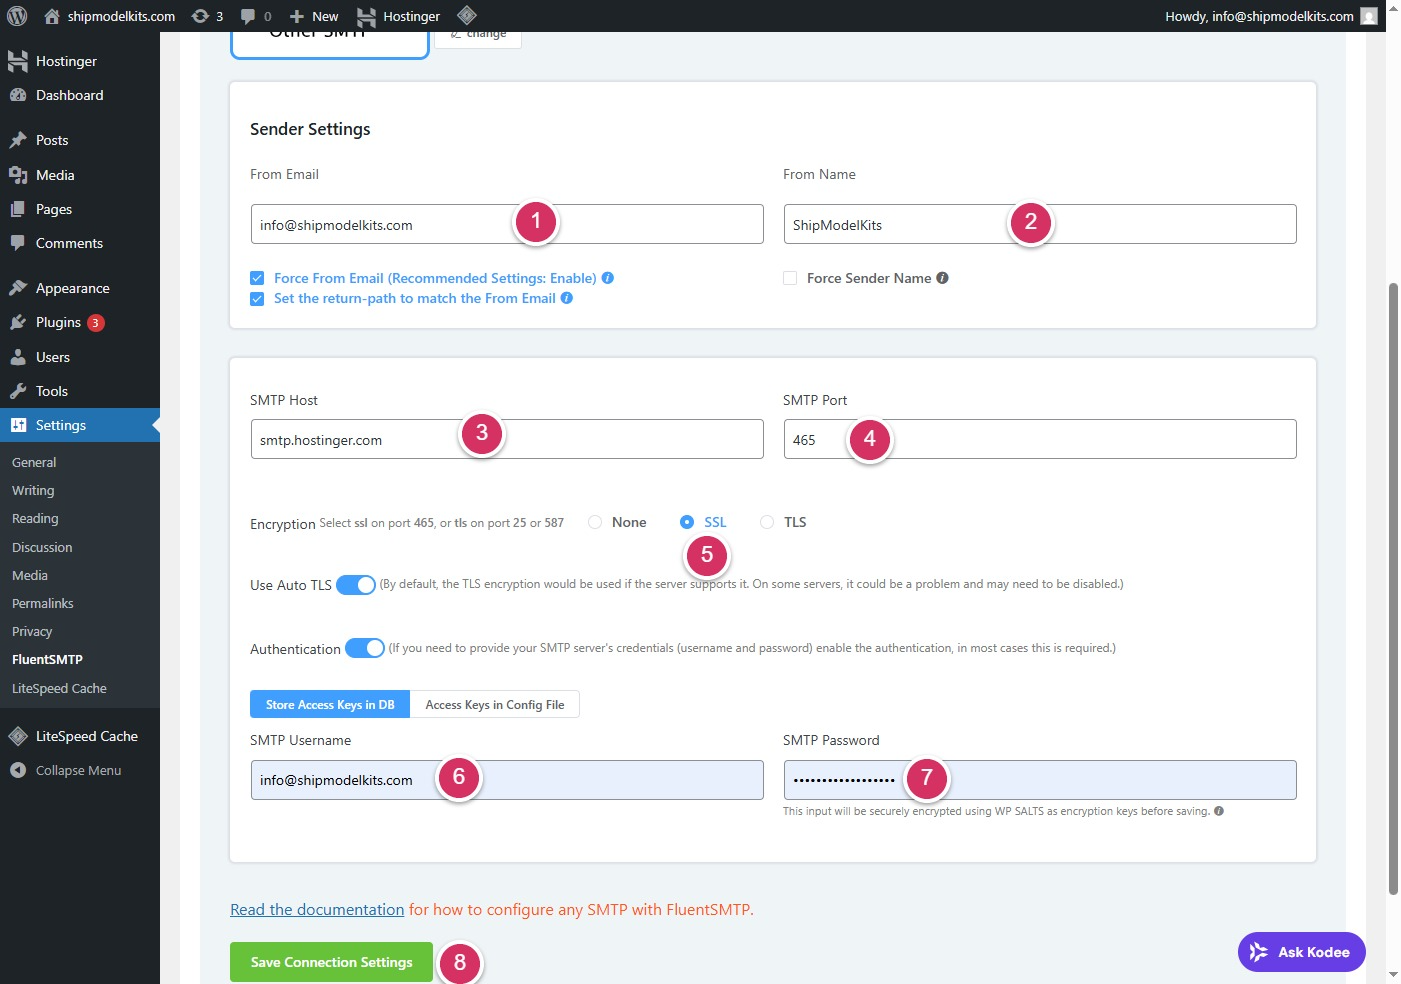
| Setting | Value |
|---|---|
| SMTP Host | smtp.hostinger.com |
| SMTP Port | 465 (SSL) or 587 (TLS) |
| Encryption | SSL/TLS |
| Authentication | Yes |
| SMTP Username | Your full Hostinger email ,The email account we registered during the course enrollment process using the corporate email service—that is, the website administrator email account. (e.g. info@yourdomain.com) |
| SMTP Password | The password of your Hostinger email account |
Click Save Connection Settings once everything is filled in.
Step 5: Test the Connection
Go to the “Email Test” tab inside Fluent SMTP.
Enter your email address and click Send Test Email.
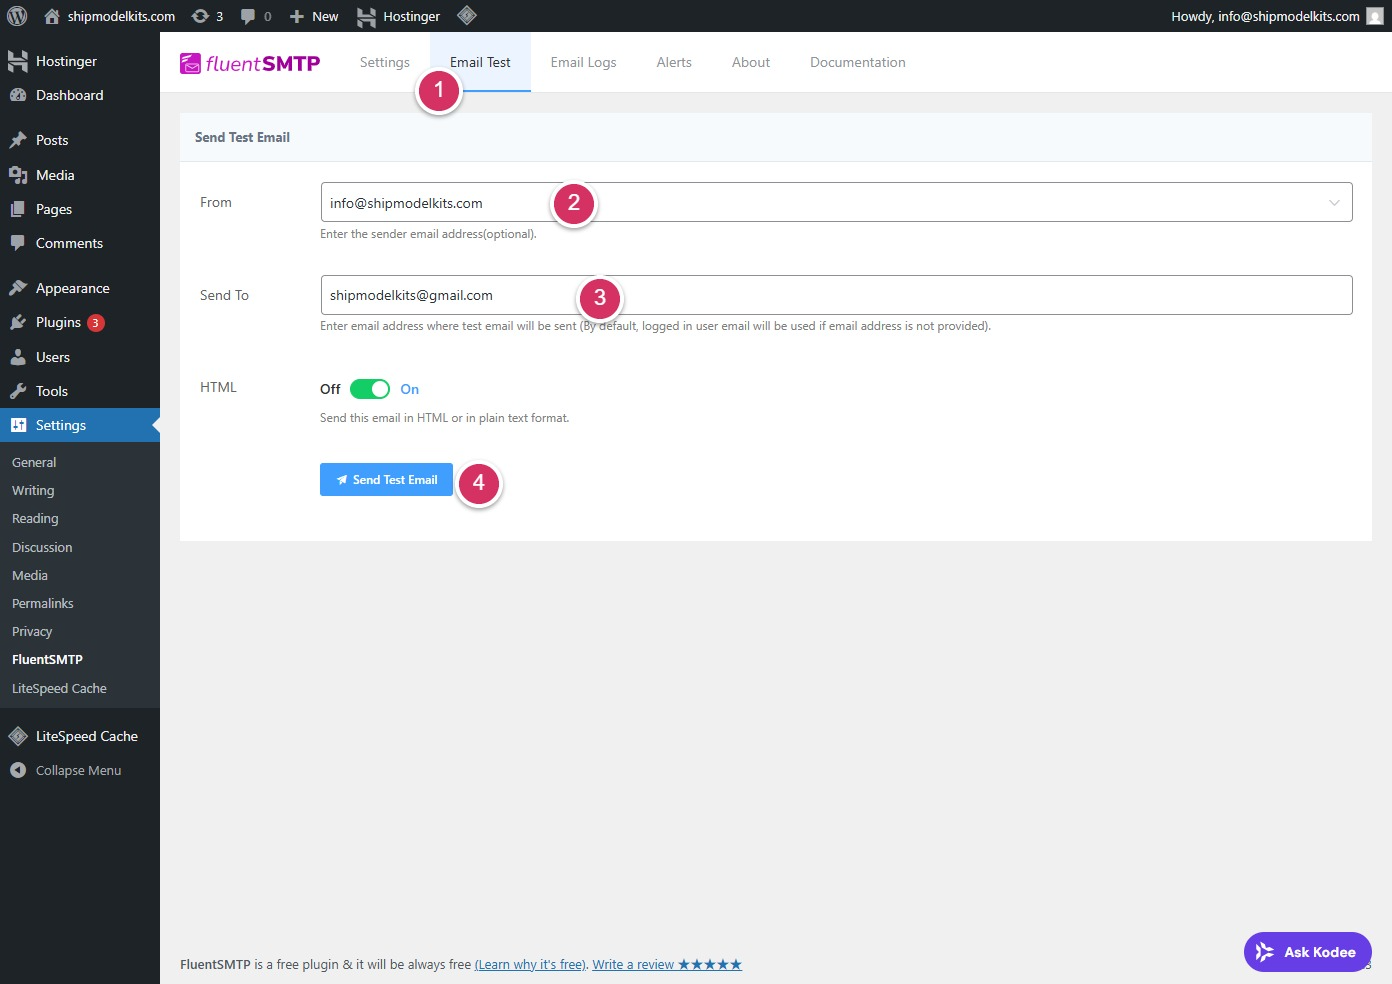
If you receive the test email successfully —

Congratulations, your configuration is working perfectly! 🎉
All future activities on your website—such as customer registrations, comments, order submissions, and inquiries—will trigger notifications sent directly to your administrator email, ensuring you never miss an opportunity.
5. Troubleshooting Tips
If your test email fails:
- Double-check your SMTP Host, Port, and Encryption type.
- Make sure your Hostinger email account is active and working.
- Some hosting environments may block outgoing SMTP ports — contact Hostinger support if needed.
6. Summary
| Step | Description |
|---|---|
| 1️⃣ | Install Fluent SMTP from the WordPress Plugin Directory |
| 2️⃣ | Connect via SMTP (use Hostinger email credentials) |
| 3️⃣ | Enable SSL/TLS for secure email delivery |
| 4️⃣ | Send a test email to confirm success |
✅ Key Takeaway
Fluent SMTP is an essential plugin for every WordPress website.
It ensures your contact forms, notifications, and transactional emails reach your users reliably and professionally — protecting your brand reputation and improving customer communication.
“Without proper email delivery, even the best website can miss its audience.”
You have now successfully installed, configured, and activated your first plugin. In the next lesson, we’ll install another essential plugin: the backup plugin.
Author Profile

- Freely.work Founder,15 years as a freelancer/digital nomad.Marketing consultant for Fortune Global 500 companies, digital marketing expert.
Latest entries
 December 17, 2025Mastering Google Search Console (GSC)
 December 16, 2025Yoast SEO Plugin: Overview, Benefits, and Installation Guide
 December 16, 2025What Is an SEO Plugin?
 December 2, 2025Adding Variable Products with Multiple Configurations