WordPress Plugin Installation Demo 3: Backup Plugin (UpdraftPlus)
💾 WordPress Backup Plugin (UpdraftPlus) Installation & Setup Guide
1. What Is UpdraftPlus?
UpdraftPlus is one of the most trusted and widely used WordPress backup plugins.
It automatically backs up your entire website — including files, themes, plugins, uploads, and database — and allows you to restore your site easily with just a few clicks.

Think of it like a safety net for your website.
If your site is hacked, crashes during an update, or your hosting server fails ,Or if an error occurs during editing a page or template that cannot be undone,— you can restore everything quickly using your latest backup.Restore to the normal state of your most recent backup.
2. Why You Should Install UpdraftPlus
Installing a backup plugin is one of the most important security steps for every WordPress user.
Here’s why UpdraftPlus is a must-have:
- ✅ Automatic Backups — Schedule backups daily, weekly, or monthly.
- ✅ Cloud Storage Support — Save backups to Google Drive, Dropbox, Amazon S3, OneDrive, or your own server.
- ✅ One-Click Restore — Recover your site easily from the WordPress dashboard.
- ✅ Free + Premium Options — The free version is enough for most users, while the premium version adds features like migration, cloning, and incremental backups.
- ✅ Trusted by Millions — Over 3 million active installations and a 4.8★ rating.
3. Installing UpdraftPlus Plugin
🧭 Method 1: Install from WordPress Dashboard
- Log in to your WordPress Admin Panel. Go to Plugins → Add New.
- Search for UpdraftPlus.
- Click Install Now, then click Activate.
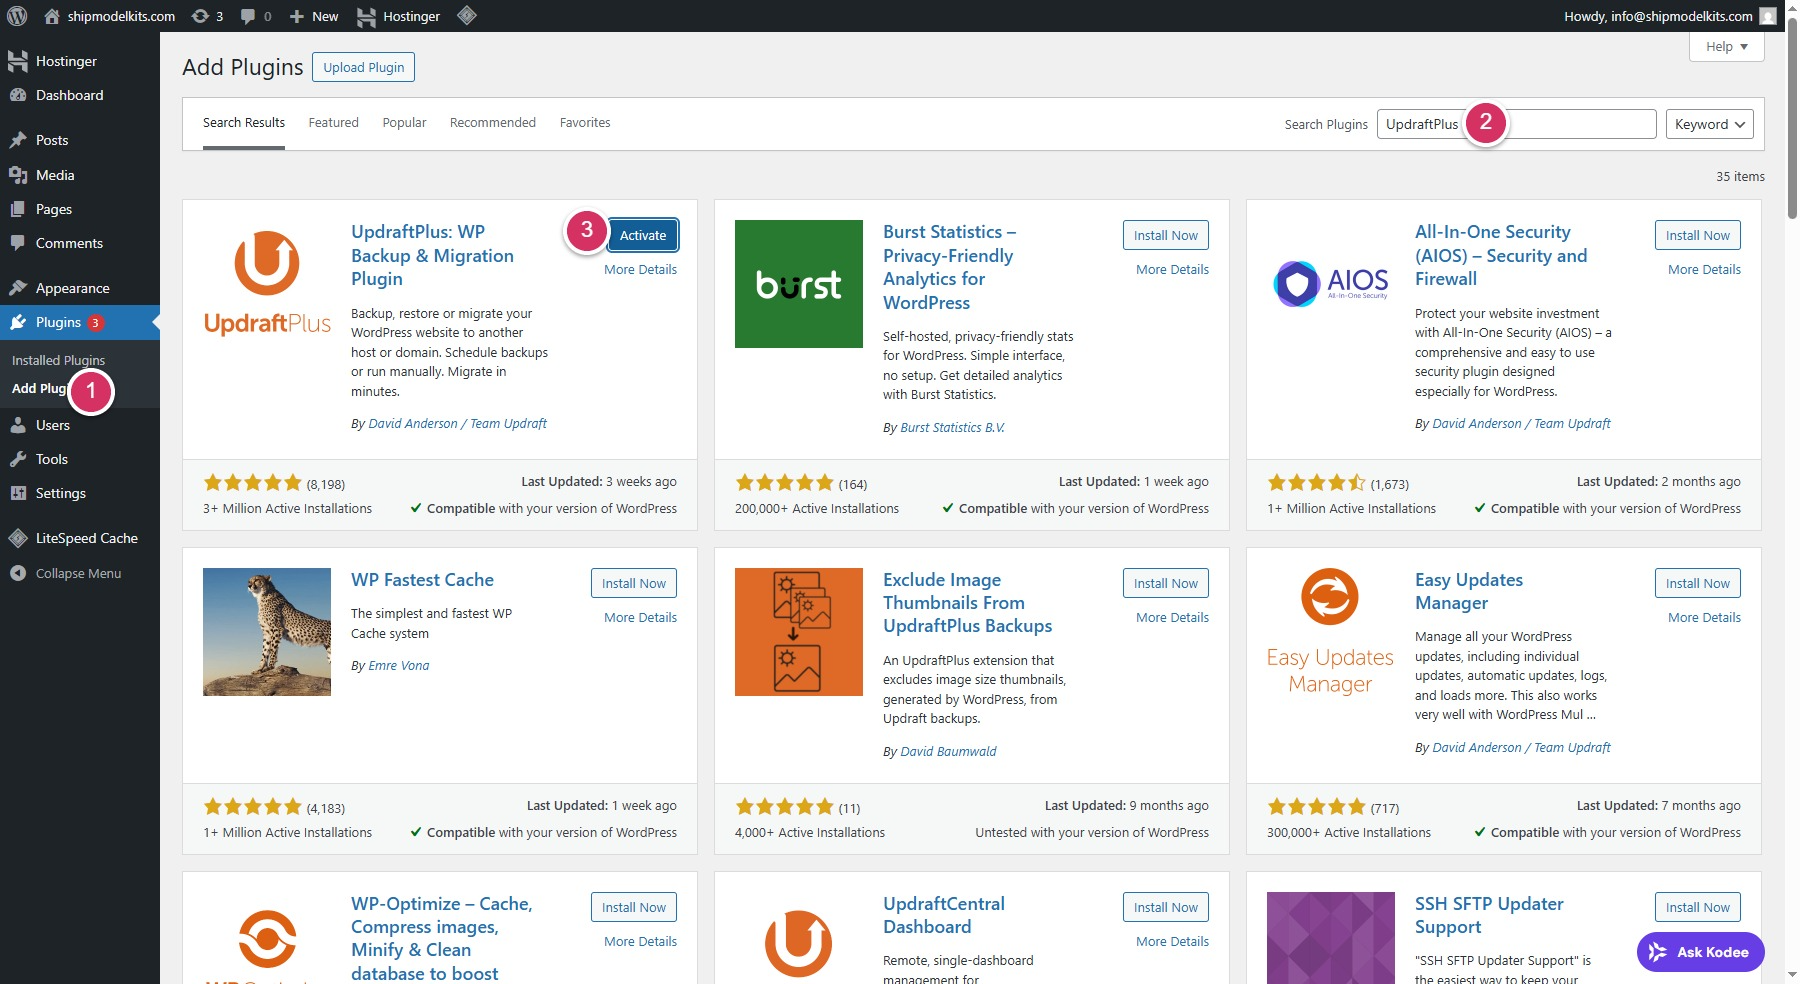
After activation, UpdraftPlus will appear in your Installed Plugins list.
4. Managing and Configuring UpdraftPlus
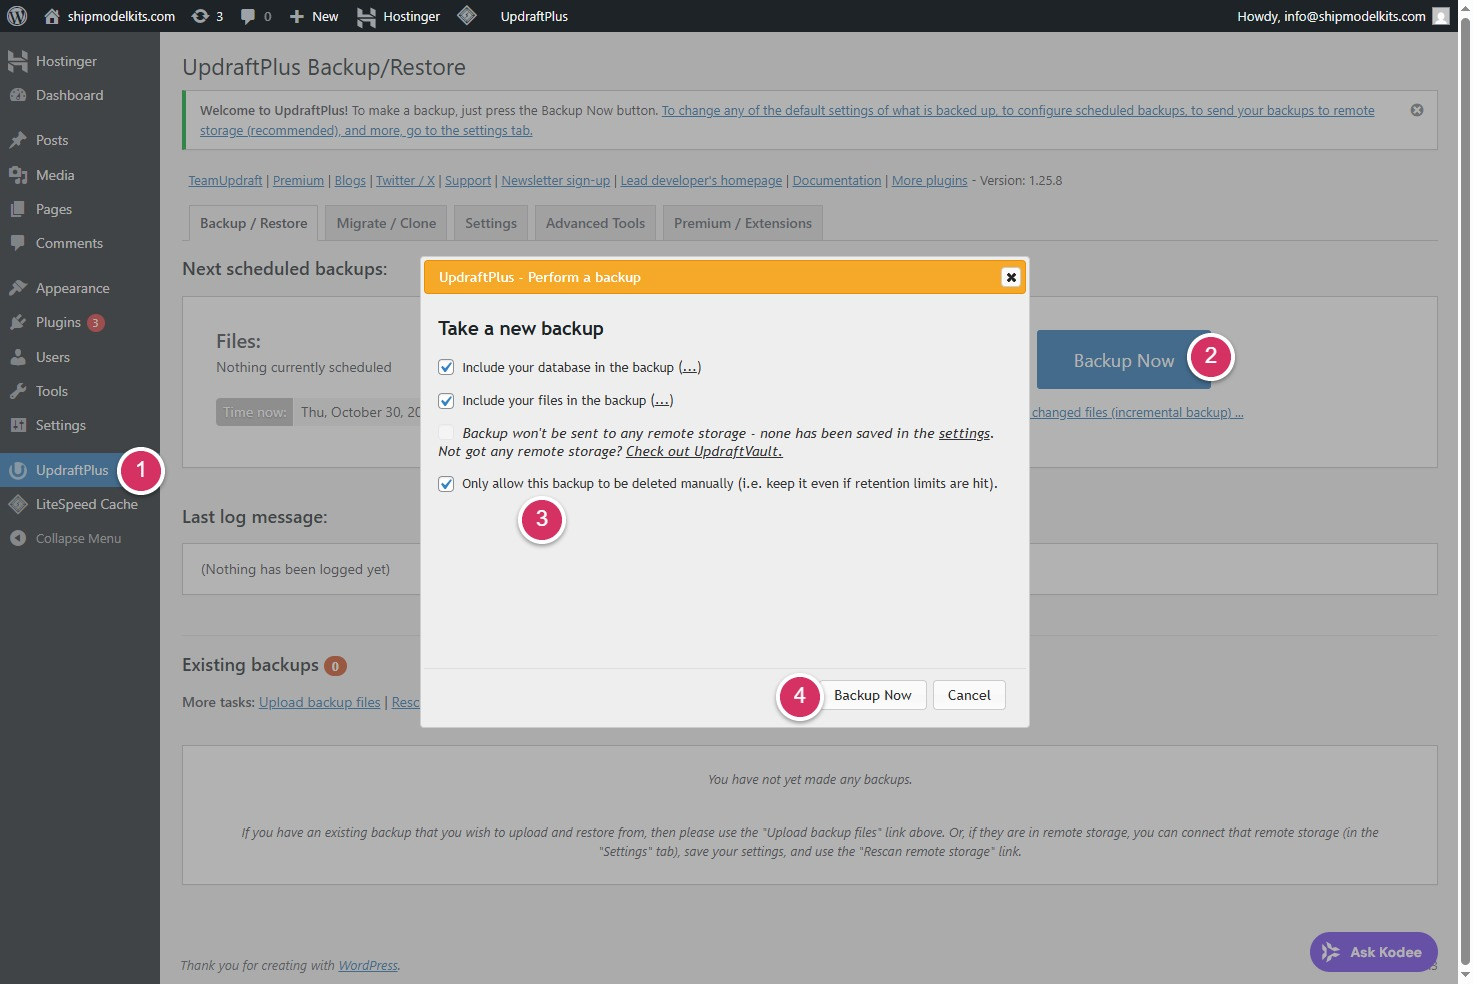
Step 1: Open Plugin Settings
Go to Plugins → Installed Plugins → UpdraftPlus → Settings.
You’ll now be in the UpdraftPlus Backup/Restore page.
Step 2: Create Your First Backup
- Click the blue “Backup Now” button.
- A popup will appear — check both boxes to include files and database.
- Click “Backup Now.”
- Wait for the process to complete. You’ll see your backup listed below.
Before performing major updates, such as updating the WordPress core, please first create a backup here. New core files may be incompatible with your old theme templates, potentially causing errors. With a backup, you can quickly restore to a normal state if any issues arise.
Additionally, if you’ve made significant updates or modifications, it’s advisable to perform a backup after confirming everything is functioning properly. This precaution prevents wasted effort and time should issues arise later on.
Please create a backup immediately.
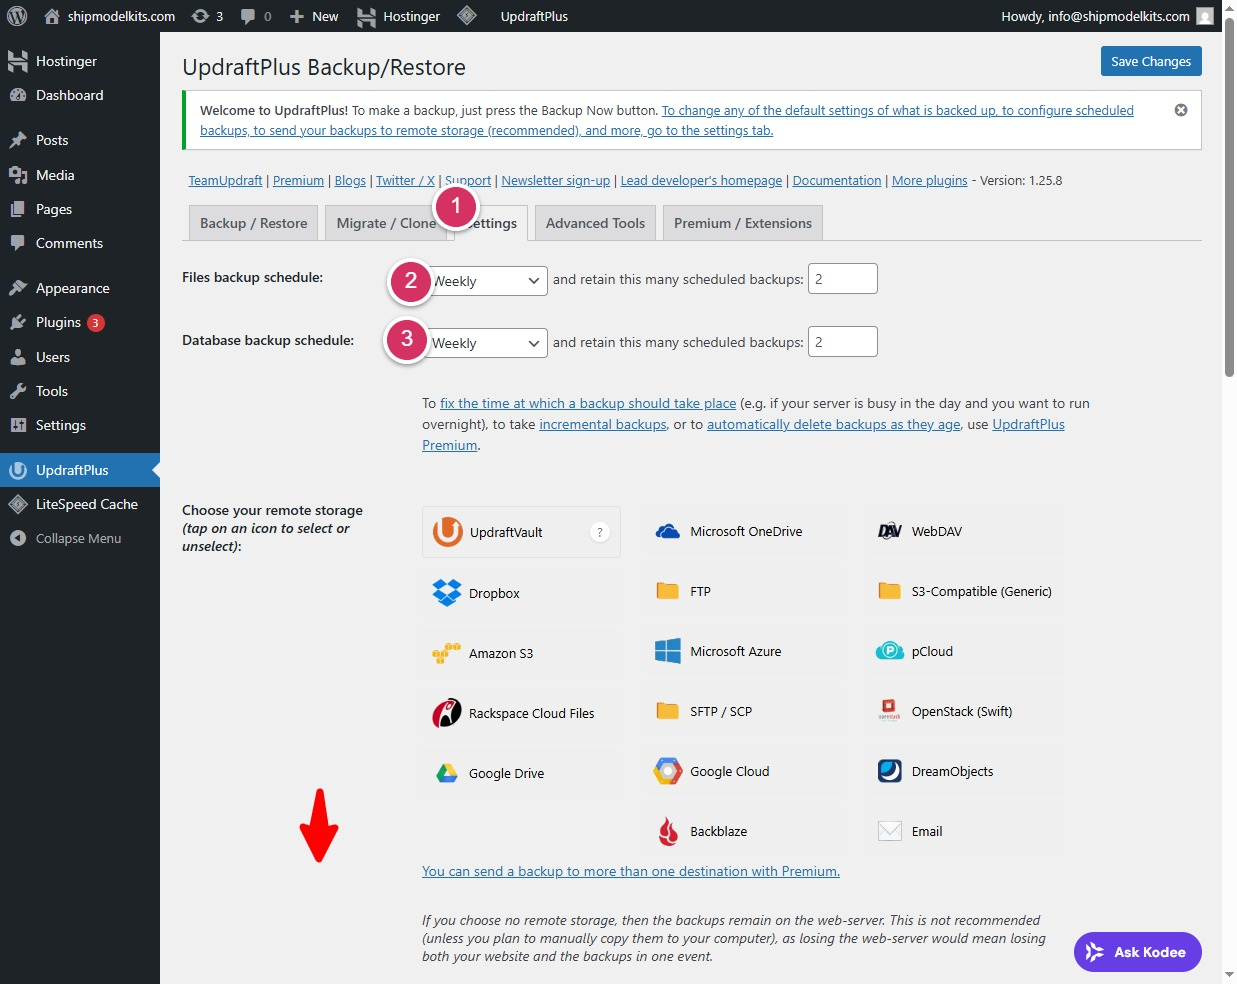
Step 3: Set Up Automatic Backup Schedule
- Go to the Settings tab within UpdraftPlus.
- Choose your preferred schedule:
- Files backup: Daily / Weekly / Monthly
- Database backup: Daily / Weekly / Monthly
- Select a remote storage location (recommended: Google Drive or Dropbox).
- Follow the on-screen instructions to connect your chosen cloud service.
- Click Save Changes when done.
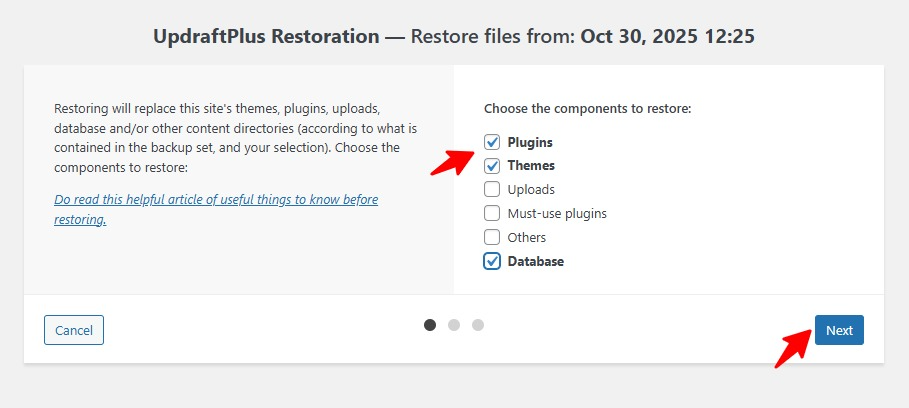
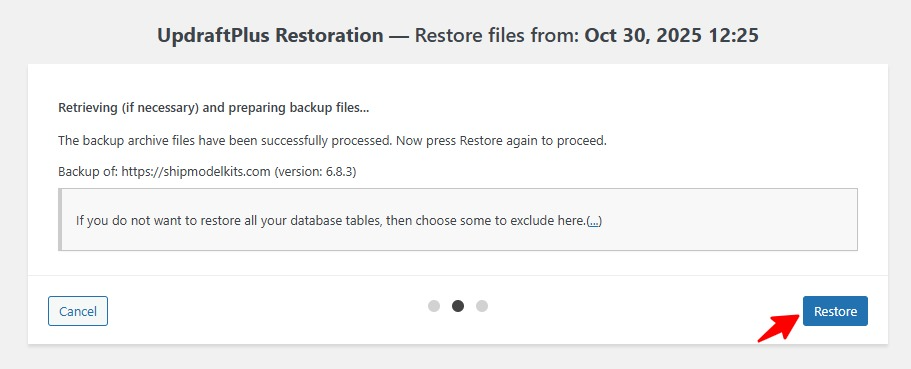
Step 4: Restore Your Website (If Needed)
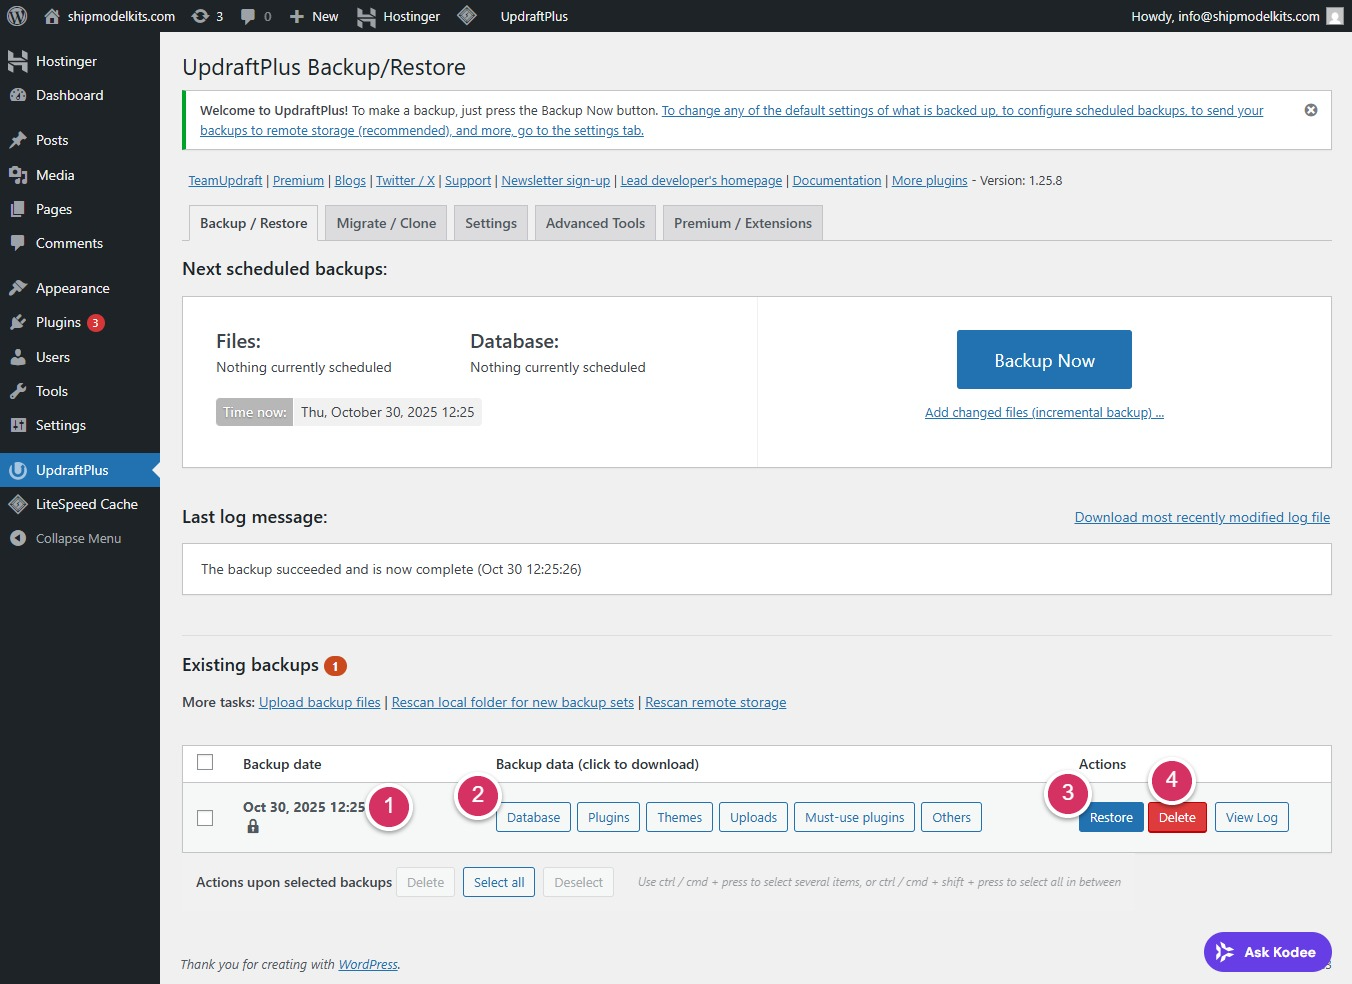
- Access the backup management interface to view and select backup date versions.
- You can choose to download the backup files to your computer for storage. These represent the database, plugins, themes, uploads, and so on.
- Click the Restore button to restore the website to the backup state you selected.You can choose which content to restore, such as plugins, themes, and the database (where posts and products are stored). Of course, you can also restore everything.
If your website files grow significantly over time, backups will consume hosting space. Therefore, you can delete backups that are no longer needed, retaining only the most recent 2-3 valid backups.
5. Recommended Backup Strategy
| Type | Frequency | Storage |
|---|---|---|
| Full Backup (Files + Database) | Weekly | Google Drive / Dropbox |
| Database Only | Daily | Google Drive / Local |
| Manual Backup | Before major updates | Local or Cloud |
💡 Pro Tip: Always keep at least two backup copies — one on your server and one in the cloud.
When you confirm that you no longer need to use the backup or restore plugin long-term, you can deactivate it on the plugin management page (note: deactivate, not delete) ,When you confirm that you no longer need to use the backup or restore plugin long-term, you can deactivate it on the plugin management page (note: deactivate, not delete) to minimize its impact on website performance. Re-activate it only when needed.to minimize its impact on website performance.
6. Troubleshooting Tips
If a backup fails:
- Make sure your hosting has enough disk space.
- Check your cloud storage connection (Google Drive, Dropbox, etc.).
- Update UpdraftPlus to the latest version.
- Disable other backup plugins to avoid conflicts.
7. Summary
| Step | Action | Purpose |
|---|---|---|
| 1️⃣ | Install and activate UpdraftPlus | Enable backup function |
| 2️⃣ | Run first manual backup | Save current website state |
| 3️⃣ | Set automatic backup schedule | Ensure regular protection |
| 4️⃣ | Connect cloud storage | Store backups safely off-site |
| 5️⃣ | Restore if needed | Recover from crashes or hacks |
✅ Key Takeaway
UpdraftPlus gives you peace of mind.
With regular backups, your WordPress website stays safe — no matter what happens.
“A website without backups is like driving without insurance — you might never need it, but when you do, it’s priceless.”
Author Profile

- Freely.work Founder,15 years as a freelancer/digital nomad.Marketing consultant for Fortune Global 500 companies, digital marketing expert.
Latest entries
 December 17, 2025Mastering Google Search Console (GSC)
 December 16, 2025Yoast SEO Plugin: Overview, Benefits, and Installation Guide
 December 16, 2025What Is an SEO Plugin?
 December 2, 2025Adding Variable Products with Multiple Configurations